VEVOR Articulating Borescope Camera: See the Unseen, Fix Faster
What It Is, Why It Matters, and Who It Helps
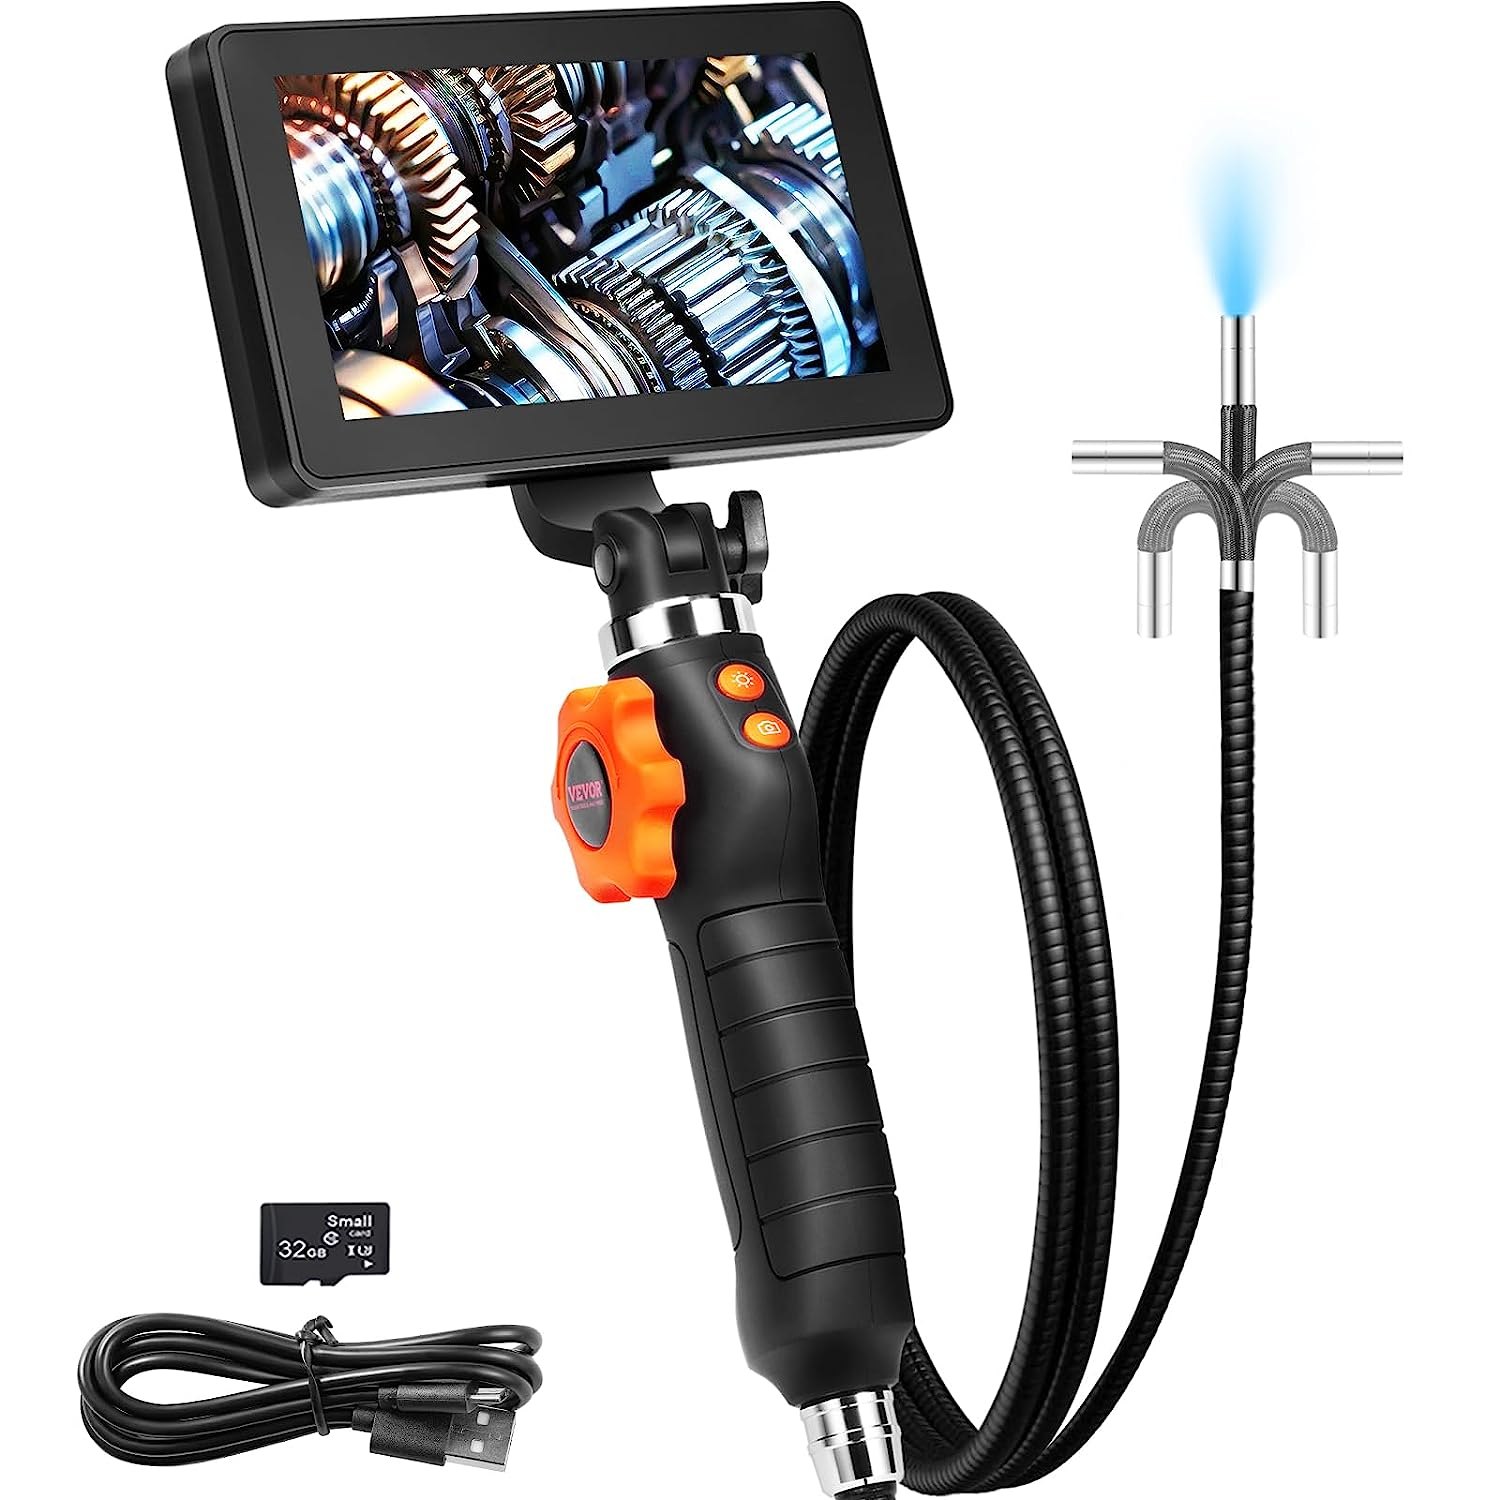
An articulating borescope camera is a small, flexible eye with a brain. The VEVOR version packs that eye on the end of a long, bendable probe. A tiny joystick lets us steer the tip inside walls, pipes, engines, and tight spaces. The camera turns. The light follows. We watch the screen and move with care. In other words, we look around corners without cutting holes or tearing things apart.
Why should we care? Because speed and certainty save money. We can find a leak before it ruins drywall. We can check a cylinder wall without pulling a head. We can inspect a clogged drain, see the snag, and choose the right tool the first time. Instead of guessing, we know. That single shift—guess to know—is the real magic here.
Let’s break the tool down in plain words:
- Probe and tip. The probe is a slim snake with a steerable head. Some models bend two ways. Some bend four ways. Either way, the tip can look forward and then swing celebrity tomato characteristics to the side. That articulation is the power.
- Camera and light. A tiny lens sits behind clear glass with bright LEDs around it. We can dim or brighten the LEDs to match the job. Low light for shiny metal. More light for dark cavities.
- Display and controls. We hold a rugged handle with a screen. A joystick steers. Buttons snap photos, start video, adjust LED brightness, and set options. It feels like a game pad, but it works like a serious tool.
- Storage and battery. We save images and video to internal memory or a card. Battery packs give hours of work. We top off with a charger between jobs.
- Accessories. Hook, magnet, and side-view mirror attachments help us pull small parts, swing our view, or recover a lost screw.


Who does this help?
- DIY homeowners. Wall cavities. Under-sink bends. Crawlspaces. Dryer vents. We spot trouble fast.
- Auto techs and engine builders. Valves, pistons, cylinder walls, turbo housings, intercoolers. We check scoring, carbon, and debris without teardown.
- Plumbers and HVAC pros. Traps, vents, coils, exchanger fins, condensate lines, and duct seams. We confirm blockages and leaks before we quote.
- Electricians and low-voltage installers. Pull paths, stud bays, junction boxes, and conduit bends. We plan runs with confidence.
- Inspectors and property managers. Attics, roofs from soffit edges, crawlspace beams, and under-floor plumbing. Photos and short clips document what we find.
- Makers and hobbyists. 3D printers, machine ways, robotics, and tight assemblies. We verify alignment and cable paths.
But most of all, it helps any of us who hate doing the same job twice. One view beats five guesses.
Let’s set expectations: the camera is small, but it still needs space to turn. Tight bends may limit the angle. Dirty environments can fog the lens. Shiny metal can blind the sensor. That’s normal. We adapt with simple moves: adjust light, wipe the tip, change the angle, and try again. Small tweaks make big differences.
What about size? Probes come in different diameters and lengths. Thin probes reach narrow spaces; thicker ones are more rugged. Long probes reach further; shorter ones handle tight curves better. We pick the right combo for our real jobs. If we often inspect engine cylinders, we choose a slim probe and a tip that can look sideways. If we work in drains, we like longer reach avada builder and a tough jacket.
Now the part we all want: easy wins from day one. We get those with clean setups, steady hands, and clear plans. The next section gives you that playbook.
How to Use It Right Now (Setup, Controls, Best Practices)
We will keep this simple, fast, and repeatable. Print it. Tape it to a toolbox lid. Share it with the team. It works.
Day-One Quick Start
- Charge and check. Fully charge the battery. Insert the memory card. Power on. Confirm the clock and date. A correct timestamp saves headaches later.
- Inspect the probe. Run your fingers along the sheath. No kinks. No sharp bends. Wipe the tip with a clean, lint-free cloth.
- Test articulation. Move the joystick slowly. Watch the tip bend. Center it gently before you insert the probe.
- Set brightness. Start with mid-level LEDs. Too bright can wash detail. Too dim hides cracks.
- Pick your mode. Photo for quick shots. Video for longer runs. Add audio notes if you can. A short voice memo—“north wall, bay 3, second stud”—is worth gold later.
- Plan your path. Know the route in and the route out. Avoid live circuits, spinning parts, hot surfaces, and chemical fumes. Safety beats speed.
Insertion Basics
- Lead with the curve. When you face a T-joint or a sideturn, pre-bend the tip slightly toward the direction you plan to look.
- Go slow. Push an inch. Pause. Look. Adjust. Repeat. A calm hand keeps the image steady and the tip safe.
- Use the screen frame. Center key features. If something looks odd, wiggle the tip slightly. Parallax vanishes and the shape becomes clear.
- Mark depth. A piece of blue tape on the probe every foot gives you drift-free measurements. “The crack starts at three feet. The seam leak is at five.” Clean and simple.
Lighting Tricks
- Dull the glare. On shiny metal, lower LED brightness. Angle the tip a little so light hits at a slant.
- Fill the dark. In rough cavities, bump LEDs up one or two steps. Move closer to reduce flicker and haze.
- Dust and fog. Pull out a few inches. Wipe the lens with a soft cloth. A tiny drop of water (not chemicals) can break surface tension on oily smears. Dry gently.
Focus and Distance
Most borescope lenses have a “sweet spot.” Too close and the image blurs. Too far and details fade. Use small nudges: closer until edges sharpen, then stop. For sidewalls euphorbia trigona, roll the probe in place to scan around the full circle. Think of it like turning your head without moving your body.
Steering and Control
- Feather the stick. Micro-moves beat big swings. Bend, hold, and breathe.
- Avoid hard locks. Full deflection against a tight corner can strain the tip. Ease off if you feel resistance.
- Reset often. Tap the joystick back to center when you change direction. It protects the control cables.
Recording What Matters
- Shoot before and after. A quick “before” sets the baseline.
- Use a naming habit. “2025-08-25_KitchenSink_TrapLeak.mp4” is clear months later.
- Log findings. One line is enough: location, depth, problem, action. “Bath vent, 6 ft, loose coupling, reseat and clamp.”
Real-World Plays
- Engine cylinders. Pull a plug. Insert the probe. Dim the light for shiny metal. Aim the tip sideways to inspect cylinder walls, ring lands, and valves. Look for scoring, carbon, and pitting. Take both stills and slow panning video.
- Drain lines. Start at a cleanout. Tape depth marks. Find the snag: hair mass, scale lip, or a dropped ring. Decide tool size with data, not guesswork.
- Wall cavities. Use a small pilot hole behind a baseboard or plate. Probe up and down. Find wires, studs, and pipes before you cut. Patch is tiny. Risk is lower.
- Ducts and coils. Inspect fins, seams, and biofilm. Adjust light to avoid glare on aluminum. Document with short clips that show both the issue and the label or nearby reference.
- Roof and soffit checks. From attic or soffit edge, look for daylight at penetrations, wet insulation, or signs of pests.
- Lost hardware. Use the magnet attachment for screws in engine bays or under machines. Guide the magnet into view and confirm the retrieval on video.
Safety We Live By
- De-energize circuits if possible. If not, keep distance and use insulated gloves.
- Avoid hot parts. Let engines, exchangers, and pipes cool.
- Ventilate tight spaces. A small fan helps. Never stick your face into a fume path.
- Protect eyes and hands. Safety glasses and snug gloves are the default.
- Respect privacy and policy. Use cameras only where you have permission and purpose.
Zero-Drama Troubleshooting
- Image is blurry. Clean the lens. Adjust distance. Reduce light on shiny surfaces.
- Tip won’t bend. Check for a kink or a tight bend. Back out. Straighten gently. Try again with smaller moves.
- Probe stuck. Do not yank. Push in a half inch, rotate slightly, then slowly pull. Patience saves the sheath.
- Glare and flare. Lower LEDs, angle the tip, or shield the light with the edge of the opening.
- No video saved. Check card seating and storage space. Reformat if needed (after backing up). Confirm you hit “record” and “stop.”
A Fast Inspection Template (Copy/Paste)
- Project:
- Location:
- Access point:
- Depth reached:
- Findings (short bullets):
- Photos/Video files:
- Safety notes:
- Next steps:
This one page turns chaos into clarity. We write it. We send it. We move on.
Team Play for Small Shops
- Assign roles. One person drives the probe. One watches the screen and calls angles. One records notes.
- Standardize settings. Keep LED and resolution defaults the same across the team. Consistent media saves time.
- Calibrate comms. Use clock directions: “rotate camera to 3 o’clock,” “pan to 10 o’clock.” Clear talk prevents mistakes.
- Share the library. Store files in dated project folders. Everyone alabama planting guide can find what they need in seconds.
Pro Tips That Feel Like Cheats
- Pre-bend the last inch of the probe slightly by hand (gently) before entering a known sideturn.
- Use painter’s tape depth marks every foot. Instant measurements.
- Slip a short length of smooth tubing over the probe for abrasive holes. It’s a cheap sacrificial sleeve.
- For ultra-tight spaces, insert a thin guide wire first, then feed the probe along it.
- When scanning floors or pans, lay the camera sideways and roll. You’ll catch low-profile cracks and seams that a straight view can miss.
When to Switch Tactics
- If you hit heavy sludge, withdraw and flush the line before you try again.
- If reflection blinds you, add a small angle and reduce light.
- If the tip fights every turn, step back and widen the entry point by a hair.
- If the job gets risky, stop and regroup. Tools do not beat physics. We do, with planning.
Care, Troubleshooting, and Smart Upgrades (Plus Buy-Right Tips)
A borescope is a precision tool. Treat it well, and it will pay you back for years. This section keeps it alive, sharp, and ready.
Daily Care in Three Minutes
- Wipe down. Use a soft, slightly damp cloth on the probe and handle. Dry before storing.
- Clean the lens. Lint-free cloth only. No gritty wipes. A gentle breath can help loosen dust.
- Coil with care. Large loops, no tight bends. Store in a case. Never pinch the probe under a lid or tool.
- Center the tip. Before you put it away, use the joystick to return the tip to neutral. Cables relax in that position.
Weekly Habits That Save Repairs
- Inspect the sheath. Look for nicks, flat spots, or crushed sections. If you find one, mark it with tape and avoid tight bends at that spot.
- Check articulation. Bend four ways. The motion should be smooth and even. Rough movement means a cable may be strained.
- Test the LEDs. Cycle brightness. Confirm even light across levels.
- Back up media. Move files to your project folders. Format the card after backup to keep it clean.
Storage and Transport
- Keep it in a padded case.
- Avoid heat and cold extremes.
- Do not stack heavy boxes on top.
- Label the case with contact info and “fragile optics.”
Long Life for the Battery
- Top off after each job.
- Do not store completely dead for long periods.
- If you won’t use it for a while, leave it around half-charge and recharge monthly.
- Keep a spare battery if your model supports it. Swap fast, keep moving.
Common Repairs and How to Avoid Them
- Cracked lens cover. Usually from drops or metal edges. Use a rubber grommet at sharp entry points. Slow down.
- Stretched articulation cables. Caused by forcing the tip against hard stops. Feather the joystick, not slam it.
- Sheath cuts. Drilled or jagged holes bite. Add a short smooth bushing or tape the edge before entry.
- Water ingress. Wipe the probe dry after wet jobs. Don’t dunk the handle. Cap the port when not in use.
Upgrade Ideas That Punch Above Their Weight
- Depth ruler tape kit. Pre-cut reflective markers at 1 ft or 0.5 m intervals.
- Slim mirror adapter. Side-view mirrors give you a full 360° look at walls and valve seats without extreme bends.
- Magnet and hook set. Recover lost bits, screws, and clips.
- Flexible entry bushings. Soft sleeves that protect probe and hole edges.
- Tablet mount. If your unit supports external display, a larger screen helps teams see fine detail.
- Anti-glare screen film. Cuts reflections when you work outside or under bright lights.
When to Choose a Different Probe
- If you keep meeting tight paths that your current tip can’t bend into, switch to a smaller diameter or tighter-bend probe.
- If you work in harsh, abrasive environments, use a probe with a tougher jacket.
- If you need long runs, step up to a longer probe—but remember: longer often means wider turns. Plan routes accordingly.
Buy-Right Checklist (Before You Click “Add to Cart”)
- Jobs you do most. Engines? Drains? Walls? Pick probe size and length for that, not for edge cases.
- Articulation style. Two-way is simple and sturdy. Four-way gives more control in complex paths.
- Tip durability. Metal tips with replaceable lens covers last longer in rough work.
- Light control. Multiple LED levels and easy buttons matter.
- Display clarity. A bright, readable screen saves eyes on long days.
- Media and notes. Photo/video capture with timestamps—and audio notes if possible—speed up reporting.
- Battery life. Get enough hours to cover a full shift or bring a spare.
- Case quality. A tough case is not fluff. It protects your investment and keeps parts together.
- Glove-friendly controls. Try pressing buttons with work gloves on. If it’s awkward, it will be worse on a ladder.
Policy and Ethics We Stand By
- Use cameras only where you have permission.
- Do not record inside private spaces without consent.
- Respect job-site rules and client boundaries.
- Store and share media securely. Label clearly. Delete what you no longer need.
Field-Proven Workflows
- Plumbing quote flow: quick scout with borescope → capture clog at depth → price the fix with confidence → show the client stills → win trust.
- Auto diagnosis: scan cylinder walls and valves → document carbon build-up → recommend service with images → log before/after proof.
- Pre-renovation survey: map studs, wires, and pipes → mark wall with painter’s tape → cut once, cut right.
- Maintenance rounds: monthly scans of bearings, belts, and housings → catch wear early → schedule downtime smartly.
Money Math That Makes Sense
- One saved teardown pays for a chunk of the tool.
- One avoided miscut saves hours and materials.
- One clear set of images wins a client’s trust and a repeat call.
- Multiply that across a month, and the camera shifts from cost to asset.
FAQ in Straight Talk
- Can it see around corners? Yes—within the bend range of the tip. Tight turns need patience and small moves.
- Can I use it in water? The probe handles moisture. The handle does not. Keep the control unit dry.
- Can I grab things with it? With the hook or magnet attachment, small items only.
- Does it work in bright sun? Yes, but glare can hit the screen. Shade the display or use a film.
- How close can it focus? Close enough to read fine scratches. Slide in and out until edges snap sharp.
- Is it fragile? Treat it like a good torque wrench. It’s tough, not indestructible.
Seven Micro-Habits that Make Us Look Like Pros
- Tape depth marks every foot.
- Speak in clock directions while steering.
- Keep LED brightness low on metal.
- Snap a still before and after every fix.
- Center the tip before pulling out.
- Coil in big loops.
- Back up media the same day.
Why This Matters Now
We are working in tighter spaces with higher stakes. Materials cost more. Labor is tight. Clients want proof. We need tools that make us fast, clear, and right the first time. An articulating borescope does that. It turns mystery into a plan. It turns doubt into a quote. It turns callbacks into thank-you notes.
We do not need hype. We need vision. This gives it to us—literally.
Sharp Turns, Clear Wins
Let’s move. Charge the unit. Clean the tip. Set the LED level. Mark the probe at one-foot steps. Pick the first target—a drain, a cylinder, a wall bay. Slide in slow. Steer with care. Watch the screen like a pilot. Capture what matters. Name the file right. Write one clean line in the log.
After more than a few runs, our hands relax. Our eyes find edges faster. Our quotes tighten. Our fixes stick. We feel the lift in every job. In other words, we stop guessing and start knowing.
Corners ahead? Good. We were built for those.